Did you accidentally nuke an important sender? While the Nuke feature is designed to be permanent, you can still recover your emails and stop future messages from being auto-deleted. Here’s how.
What Happens When You Nuke a Sender?
When you use the Nuke Sender (or Nuke Company) feature, CMDK does two things:
- Deletes all existing emails from that sender (moves them to Trash)
- Creates a Gmail filter that automatically deletes any future emails from that sender
To fully undo a nuke, you’ll need to reverse both of these actions.
Step 1: Recover Your Deleted Emails from Trash
Good news! Deleted emails stay in your Gmail Trash for 30 days before being permanently removed. Here’s how to recover them:
- Open Gmail
- In the left sidebar, click Trash (you may need to click “More” to see it)
- Or simply search:
in:trash
- Or simply search:
- Find the emails from the sender you accidentally nuked
- Tip: Search
in:trash from:[email protected]to find them quickly
- Tip: Search
- Select the emails you want to recover
- Click the Move to icon (folder with arrow) and choose Inbox or another label
Your emails are now restored!
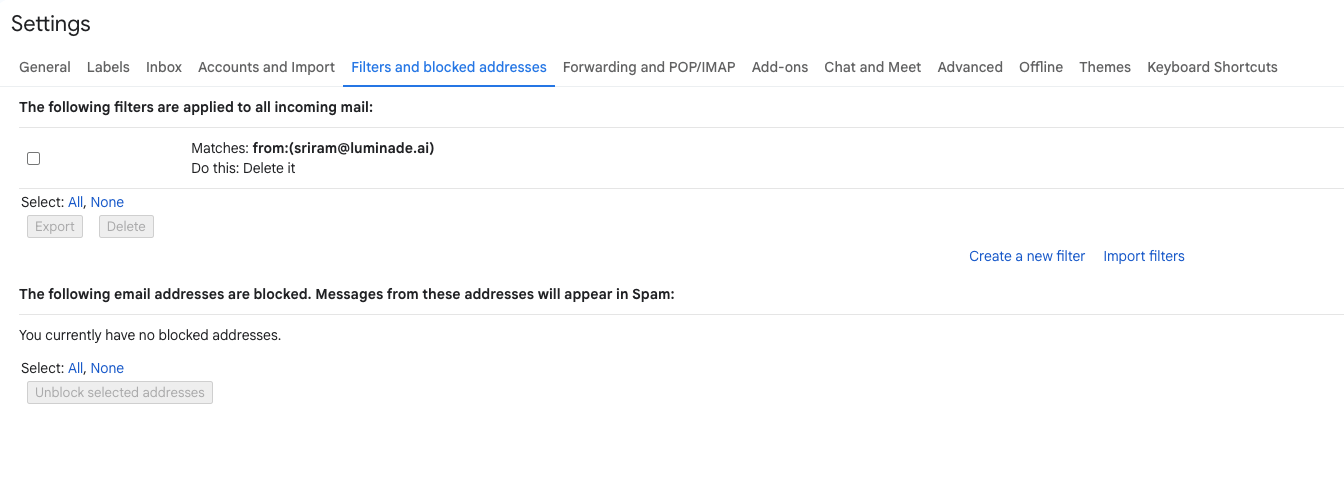
Step 2: Remove the Gmail Filter (Critical!)
This is the most important step. If you don’t remove the filter, Gmail will continue to automatically delete all future emails from this sender.
- In Gmail, click the gear icon (⚙️) in the top right
- Click See all settings
- Go to the Filters and Blocked Addresses tab
- Scroll through your filters to find the one matching the sender you nuked
- Look for filters with the sender’s email address (e.g.,
from:[email protected]) - For Nuke Company, look for the domain (e.g.,
from:company.com)
- Look for filters with the sender’s email address (e.g.,
- Click Delete next to that filter
- Confirm the deletion
That’s it! Future emails from this sender will now arrive in your inbox normally.
Quick Summary
| Action | How to Undo |
|---|---|
| Deleted emails | Recover from Trash (within 30 days) |
| Auto-delete filter | Delete filter in Gmail Settings → Filters |
Tips to Avoid Accidental Nukes
- Double-check the sender before confirming the nuke action
- Use Archive instead of Nuke if you’re unsure — archiving doesn’t create a filter and keeps emails recoverable
- The Nuke confirmation modal shows you exactly which sender/domain will be affected — read it carefully!
Need More Help?
If you’re having trouble finding the filter or recovering your emails, feel free to reach out to our support team. We’re happy to help!
Remember: Nuke is a powerful feature designed for senders you truly never want to hear from again. For senders you might want to hear from occasionally, consider using Archive All or Unsubscribe instead.